
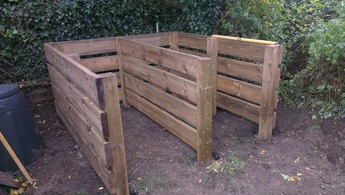
A common job for landscape gardeners is the construction of composters. Perfect for the keen gardener these can provide all of your composting needs and are great for the environment.
In the example pictures we are creating a double composter. The same principles apply if you creating a more simple single composter.
The tools you will need for this job are: a spirit level, a drill and impact driver, a saw, a spade and possibly a bar. The materials you will need include 3” or 4” posts, 1” by 4” boards, ballast and cement, and screws/timberlockers.
STAGE 1 - CUT THEN STAIN THE SLATS
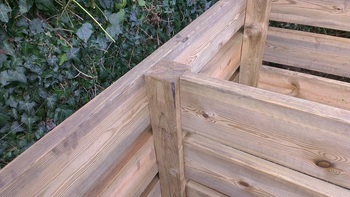
I would suggest using 1” by 4” boards for the slats. First of all decide on the dimensions that you want for your planter and cut the boards to size. The side slats should finish flush with the front and back posts and the rear slats will need to overlap these (two inches wider if using 1” thick boards).
You should leave a gap of roughly 2” between each of the slats for aeration so take this into account when deciding how many slats you will need.
Once the boards are cut to size make sure they are stained for longevity.
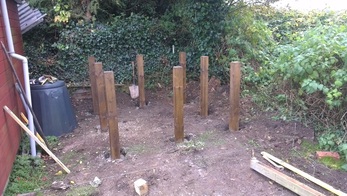
STAGE 2 - DIG AND SET THE POSTS
First you will need to dig the postholes. You will need a spade and possibly a bar if the ground is rocky. The holes should be deep and narrow if possible, to a depth of at least 18 inches.
Depending on the size of the planter you will need at least six holes and the planter we are building here requires eight. As you can see from the image the posts are spaced in three lines parallel to each other. The outside lines have three holes for additional support and the centre line has two.
You want the upper slats to be flush with top of the posts if you can. Using a level and tape measure cut the posts to size (test them in the hole to mark where you will cut the post). 3” posts should be enough for a small composter but 4” are recommended for longevity.
Attach the upper slat flush with the top of the posts as they sit in the postholes. Check the level and pack the bottom of a hole with stone to achieve a level if necessary. Now you are ready to set the first line of posts.
As you will be setting more than one post at the same time I would suggest using a ‘stiff’ ballast and cement mix. This will allow you to make adjustments to the level of the posts whilst providing enough instant support to continue with the other posts without having to wait for the mix to go off.
Now set the second edge line of posts in the same way. Check the finished height is the same using a level before concreting them in. It is advisable to attach the upper back slat to help achieve this.
Finally the middle two posts can be set. Use a level and tape measure to check the line and spacing to ensure they are centrally positioned and level.
STAGE 3 - ATTACH REMAINING SLATS
The upper slats should already be attached flush to the top of the posts. Use a level as a spacer to determine where the next slat down should be attached.
If you are constructing a double composter then you will also need to insert slats between the two central posts. I would advise measuring the length of these individually incase the posts are not exactly level. You will need lengthy screws/timberlockers to go through the back slat, post and then into the central slat.
If you do not have screws this long you can remove the rear
upper slat to gain another inch. You may need to pre-drill here
if your drill is not up to the challenge.
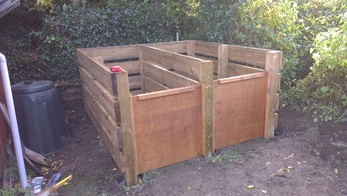
STAGE 4 - CONSTRUCT THE DOORS
On each of the front posts you will need to attach two batons (both sides on the middle post if you are constructing a double composter). The doors themselves can be constructed out of ply (1/2 to ¾ of an inch should be sufficient.
Cut the doors to size and stain them. The batons (1” by 1” should do) will need to be screwed into the posts leaving a gap slightly wider than the ply. You may need to pre-drill the batons before you screw them into the posts to prevent them splitting. On the doors themselves screw in a length of baton horizontally near the top to act as a grip.
That's it, your composter is ready to use!
 RSS Feed